You can cancel your Netflix membership at any point during the month. The cancellation will be effective at the end of your current billing period. This means that even after cancelling your subscription, you will still have access to your account until the end of the billing period.
You can restart your Netflix membership at any time. All your account details and viewing preferences will be stored for 10 months after cancellation.
How to Cancel Your Netflix Subscription
You will have to log onto Netflix.com to cancel your subscription, you cannot unsubscribe from the Netflix app.
Step 1: click on the menu in the right-hand corner (hover on your profile picture or click on the down arrow)
Step 2: click on Account
Step 3: under the first section, “Membership & Billing” click on “Cancel Membership”
Step 4: decide if you want to stay subscribed to the Netflix mailing list by ticking or unticking the opt-in box
Step 5: click on “Finish Cancellation”
What if I Don’t See the Cancel Option on My Netflix Account
If for some reason you don’t see the “Cancel Membership” button on your Account page, you will have to cancel your Netflix subscription through your billing company.
What Happens If You Cancel Netflix Early?
Your account will only automatically close at the end of your billing period. Even if you are still on your free trial, you won’t be charged for streaming content after you have activated the cancellation process. But you can continue watching shows and movies until your account closes down.
Click on the Billing details link on your Account to see when your account will end.
Image by igeeksblog.com
Will I Have To Start All Over If I Restart My Netflix Account?
If you reactivate your Netflix account within 10 months of the cancellation, you will just pick up where you left off. This includes all your account details ratings, and recommendations.
Will I Be Charged If I Cancel Netflix?
After cancellation, you will not be charged any extra membership fees, unless you reactivate your account.
My Netflix Account Is On Hold What Happens If I Cancel?
In this case your account will be immediately closed without any further access, even if you cancelled before the end of your billing period. But you will not be charged again unless you reactivate your account.
What Happens If I Cancel Netflix And I Have A Gift Card/Promotional Balance On My Account?
Once the promotional balance is consumed, your Netflix account will be cancelled. After your account cancellation request, you can continue streaming as long as the promotional balance lasts. Once it is finished, your cancellation will be activated.
Can I Rejoin If I Cancel Netflix?
You can reactivate your account at any time from the Account page. Make sure you remember your login details.
https://localdstvinstaller.co.za/wp-content/uploads/2019/05/netflix-how-to.png600600LocalDSTVhttps://localdstvinstaller.co.za/wp-content/uploads/2018/02/no-300x141.pngLocalDSTV2019-06-03 16:32:442019-11-21 10:38:37Netflix How To | How Do I Cancel My Netflix Subscription?
Netflix changed its rating system in 2018 to an easy “thumbs up” or “thumbs down”. This replaces the old traditional rating system of five stars. Together with the rating system, Netflix’s built-in recommendations algorithm will start suggesting shows for you to watch, based on your ratings and ongoing viewing history. The more you watch Netflix, the more relevant recommendations will pop up.
Does The Netflix Ratings Affect My Recommendations?
There are literally thousands of shows and movies available for streaming on Netflix. By rating the shows and movies you watch, you will help the Netflix algorithm to get a better idea of your personal likes and dislikes.
The recommendation algorithm works on a few factors: all the shows and movies available; your personal streaming history, and any ratings you made; as well as the combined ratings of other Netflix members with similar tastes to yours.
These factors are combined to create the percent match score when you type in a title. And this score is unique to each Netflix user. It gives you an indication of how likely you are to appreciate the titles.
Tip: scroll to the bottom of the Netflix home page to see Top Picks for you and shows/movies recommended because you watched similar ones.
How do the Netflix ratings work?
Every time you leave a rating on a show or a movie, the Netflix recommendation algorithm takes notes. You are teaching Netflix more about your personal viewing likes and dislikes. This way the suggestions that Netflix shows you on the home screen can be more tailor-made to your personal viewing preferences.
When you go into your account and click on Ratings under the My Profile, you can see all the shows that you have rated. The old rating system is still saved here, showing you the star rating system previously used to personalize your Netflix experience.
Some of the older devices used for streaming Netflix, such as Smart TV’s, set-top boxes, and Blu-ray players will still display the old star rating system. If you use any of these now to make a new rating, it won’t be saved. If you want to rate the show, you must log on to Netflix.com or access the shows from your mobile app.
Update Your Netflix Ratings
If you have not been rating the shows and movies you’ve been watching on Netflix, you can backtrack your streaming activity. Add a thumbs up or down now to activate the Netflix recommendations algorithm on your account.
Under the Account section, scroll to My Profile at the bottom, click on Viewing Activity. This will show you a list of the shows and movies you’ve previously watched on Netflix. Click on a show episode or movie to access it. Under the title look for the thumbs up and down icons and add your rating.
https://localdstvinstaller.co.za/wp-content/uploads/2019/05/netflix-how-to.png600600LocalDSTVhttps://localdstvinstaller.co.za/wp-content/uploads/2018/02/no-300x141.pngLocalDSTV2019-06-03 13:16:562019-11-21 10:38:43Netflix How To | Find Ratings & Recommendations
What do you do when someone is accessing your Netflix account without your permission? The first way that this can happen is if someone is using your Netflix account without permission because they know your login details. Or it could be that your account was hacked. Either way, there are a few steps to follow when you notice someone misusing your account. You firstly need to sign out of all the devices that are linked to your account. Next, you must change your password and make sure that your account is secure. Follow the steps below to make sure that you are the only one with access to your Netflix account.
Step 1: Log in to your Netflix account
Step 2: Go to the settings menu, at the top right, hover on the profile pic, or click the dropdown arrow
Step 3: Next select “Account”
Step 4: Under the “Settings” menu, click on “Sign out of all devices”
Step 5: Next click on “Sign Out”. Please note, it can take up to 8 hours to reset your logins
Photo by Business Insider
How to Change Your Netflix Password
After the login reset, change your password on your next login. This will prevent anyone from using your Netflix account without permission in the future. If you are experiencing issues with your password, click here for a reset link.
Step 1: Log in to your Netflix account
Step 2: Go to the settings menu, at the top right, hover on the profile pic, or click the dropdown arrow
Step 3: Next select “Account”
Step 4: In the first section click on “Change Password” next to your login email address
Step 5: Type in your old password
Step 6: Choose a new secure password. Tick the box “Require all devices to sign in again with new password”
Step 8: Lastly, click “Save”
Some people still experience issues even after they have logged out of all their devices. Watch the following video for an add-on protection element to secure your account.
https://localdstvinstaller.co.za/wp-content/uploads/2019/05/netflix-how-to.png600600LocalDSTVhttps://localdstvinstaller.co.za/wp-content/uploads/2018/02/no-300x141.pngLocalDSTV2019-05-29 12:53:382019-11-21 10:38:49Netflix How To: What do I do when someone is using my Netflix account without my permission?
Although Netflix is mainly a live video streaming service, they have heard the lamentations of the people and you can now download some of the content to watch offline. This is a great option if you have limited access to uncapped WiFi. Or if you are planning a trip to a location where you know the signal will be either weak or completely missing in action.
Now you can plan your Netflix binging sessions with downloaded episodes of your favourite series, if available for download, or stock up on a few movies for a weekend in a remote area.
How to Download Netflix Content
To use the download function of the Netflix service, you have to first download the Netflix app for your device. The download function is not available when using an internet browser to view Netflix content.
Step 1: open the Netflix app on your device. Access the menu in the top left corner or look for “Downloads” at the bottom of the screen.
Step 2: click on “Available for Download.”
A list of all the shows and movies available for download appears here. You can also use the search function to sift through the content if you are looking for something in particular. If a show or movie is available for download, a down-facing arrow will appear next to the episode or after the description of the movie. If there is no arrow, it’s not available for download.
Step 3: choose the program you want to download and tap on the arrow to start downloading. You will need an active internet connection for the duration of the download.
Photo by theverge.com
How to View Downloaded Netflix Content
Once your download is complete, it will be stored on your device. Please note, the offline download is only available on the device you downloaded it on. You can then access the downloaded Netflix shows and movies without being connected to the internet.
From the menu at the top right, click on “My downloads”. Or click on “Downloads” at the bottom of your screen. The Netflix content that you have downloaded will appear here. On your smartphone a blue icon will appear next to the downloaded content. You can access the episode or movie the same way as online Netflix content.
https://localdstvinstaller.co.za/wp-content/uploads/2019/05/netflix-how-to.png600600LocalDSTVhttps://localdstvinstaller.co.za/wp-content/uploads/2018/02/no-300x141.pngLocalDSTV2019-05-29 12:29:292019-11-21 10:38:54Netflix How To | Download Netflix Shows & Movies
What devices are the best for watching Netflix? Because it’s an online video streaming service, almost any internet enabled device can connect to the Netflix platform. These include Smart TV’s, Blu Ray players, computers, phones, tablets, home theatre systems, HDTV’s, gaming consoles, and set-top boxes.
Download the Netflix app, or directly stream from a Netflix supported web browser.
Netflix Supported Devices
Netflix supports the follow devices and brands. Is yours not included? Check to see if you can access the internet from it, and open Netflix on a browser or directly download the app.
Streaming Media Players:
Supported: ChromeCast and AppleTV
The plug&play feature works perfect for streaming Netflix. The latest technology of media players and streaming sticks offer you an effortless way to transform your TV into a Netflix home theatre.
Smart TV’s:
Supported: Hisense | LG | Panasonic | Philips | Samsung | Sharp | Sony | Toshiba
Enjoy the handy built-in connection on the newest Smart TV’s. Netflix access is ready and waiting for you, without the need of an extra connectivity device.
Tip: look out for the Netflix Recommended TV logo when choosing a Smart TV.
Game Consoles:
Supported: PS3 | PS4 | XBox360 | XBoxOne
You can switch between playing games and playing Netflix movies on a variety of game consoles.
Photo by cordcutters.com
Set-top Boxes:
Just switch channels and easily jump between watching live television and a Netflix show. The set-top boxes (STB’s) directly connect with your television. More and more paid TV providers now also support Netflix.
Blu Ray Players:
Supported: LG | Panasonic | Samsung | Sony
The Blu-ray player has revolutionized home entertainment theatre systems, and now you can also stream Netflix from them to immerse yourself in the sights and sounds.
Smartphones and Tablets:
Supported: Android | Apple | Windows Phone
Take Netflix with you, wherever you go. By downloading the Netflix app on your smartphone or tablet, you can watch Netflix from anywhere. You can also download Netflix shows to watch offline.
PC’s and Laptops:
Any computer with internet access can connect to Netflix. Most of the popular browsers are optimized for Netflix viewing, whether you are using a PC or a Mac.
https://localdstvinstaller.co.za/wp-content/uploads/2019/05/netflix-how-to.png600600LocalDSTVhttps://localdstvinstaller.co.za/wp-content/uploads/2018/02/no-300x141.pngLocalDSTV2019-05-29 12:00:532019-11-21 10:39:00Netflix How to | With what devices can I connect to Netflix?
If multiple members of your family has access to your Netflix account, you can change the parental control to make sure that younger members are not exposed to inappropriate content. There are two levels of control: account-level (hard controls) and profile-level (soft controls).
For the Hard Controls a PIN code will be required for certain maturity ratings. You can create a 4-digit PIN to enter if a specific show or movie has a maturity level restriction. This way your child will not be able to access inappropriate content.
The Soft Controls are linked to the profile. This way the entire profile is linked to a specific maturity level. Your child will then only have access to specific age restricted content.
How to Create a PIN on Your Netflix Account
Before you can select age restrictions, you must first create a PIN for your account. PIN settings are only available on devices older than 2013.
Step 1: Login to your account on a web browser
Step 2: Select “Account” from the menu on the top right
Step 3: Under the “Settings” section, select “Parental controls”
Step 4: To change it, you will need to enter the account password
Step 5: Click on “Continue”
Step 6: Choose a four-digit numbered PIN, letters are not permitted
Step 7: Choose the protection level from the options:
ALL (Little Kids)
7+, some 13+ (Older Kids)
13+ (Teens)
16+, 18+ (Adults)
Activate the PIN on Your Netflix Account
The main account holder can choose how the PIN will be used for the account. It can be linked to the maturity ratings. Or it can be linked to specific movies and shows.
Under the “Restrict by Maturity Level” select the top level of access allowed:
Step 1: Select the first dot to PIN protect All content
Step 2: Select the second dot to PIN protect Older Kids and up content
Step 3: Select the third dot to PIN protect Teens and up content
Step 4: Select the fourth dot to PIN protect Adults content
Step 5: Select the fifth dot to switch PIN protection off
Under the “Restrict Specific Titles” section you can start typing a specific show or movie name. Select it from the list to add to your restricted content. You can remove it again by clicking on the little x that appears to the right of the added title.
After you have made the changes to the parental controls on your Netflix account, press “Save” at the top next to your PIN.
Please note: The parental control changes might not reflect on all devices immediately. If the new settings still don’t reflect, try to refresh the device, or log out and back in again.
Use a Profile as Parental Control
If you are in control of logging in to your Netflix Account on behalf of your children, you can use the “Kids” profile set up.
Step 1: Select “Manage Profiles” from the top right menu
Step 2: Click on the profile picture for “Kids”
Step 3: Under the dropdown “Allowed TV shows and movies” select the age restriction
For little kids only
For older kids and below
For teenagers you can create an extra main profile and select “for teens and below”.
When Do You Have To Enter your Netflix PIN
You will have to enter your PIN every time you try to watch a restricted show or movie. Sometimes ratings can also change between episodes of a specific series. Once you have entered your PIN you can continue watching without restriction until you switch profiles or sign out. If your account was dormant for a while, you must reenter your PIN before watching. You will also be required to enter the PIN if you are downloading restricted content.
On all iOS devices you must enter the PIN before you can download. On the Windows 10 app and Android devices you can start the download without the PIN, but it will block viewing of the restricted content afterwards.
How Do You Recover a Forgotten Netflix PIN
If you can’t remember your PIN there is an easy way to recover it. Your PIN links to your account login email.
Step 1: Under the login number blocks a link will appear saying “Forgot PIN?”
Step 2: A popup will appear with the Netflix Sign In page
Step 3: Enter your password
Step 4: Enter your new PIN and click on “Save Pin”
How to Remove a PIN from Your Netflix Account
Once you have created a Netflix PIN you can’t delete it again. The only way of deactivating it, is to set your parental controls to the highest setting of “Adults” (select the last of the green dots). If the change does not reflect immediately, try to switch between profiles, or sign out and back in again.
https://localdstvinstaller.co.za/wp-content/uploads/2019/05/netflix-how-to.png600600LocalDSTVhttps://localdstvinstaller.co.za/wp-content/uploads/2018/02/no-300x141.pngLocalDSTV2019-05-29 11:26:282019-08-28 14:19:16Netflix How To | How Do I Set Parental Controls on My Netflix Account?
There are three different types of Netflix Plans:
With the Basic Plan you can only view shows on one device at a time, and only in SD (Standard Definition). You can also only download shows and movies on one device. A Standard plan increases your devices to 2, for watching and downloading. And you can view content in HD (High Definition). On the Premium plan your devices are pushed up to 4, for watching and downloading. Plus, you can view content in HD and Ultra HD.
Netflix recommends the following connection speeds for each plan:
Basic — 3.0 Mbps; Standard — 5.0 Mbps; and Premium — 25 Mbps for Ultra HD.
Please note: memberships activated before 5/10/2014 will only have a one-screen or two-screen option linked to their account. To access the Premium plan, you must unsubscribe and reactivate your account.
How to Switch Between Netflix Plans
You can change your Netflix plan at any time during your membership, because it is billed month to month. If you want to change your Netflix plan, you need to log in to netflix.com and access your account details. Or click here for a direct link. You can’t change your Netflix plan directly from your streaming device.
Step 1: View the menu and select “Account”
Step 2: Find the “Plan Details” and click on “Change plan”
Step 3: View the available plans and choose a new one
Step 4: After selecting your updated plan, click on “Continue”
The changed plan rate will take effect with your next monthly payment. But you can access the new features immediately.
If you are paying for your Netflix account via iTunes, you must choose the new plan in the iTunes settings itself, not on the Netflix website.
Step 1: Sign in to your iTunes with your Apple ID and password.
Step 2: Click on the profile picture in the top right and choose “Account Info.”
Step 3: To access your account, type in your Apple ID again
Step 4: Select the “Subscriptions” section
Step 5: Confirm that you want make a change to your plan. It will be updated with your next payment
https://localdstvinstaller.co.za/wp-content/uploads/2019/05/netflix-how-to.png600600LocalDSTVhttps://localdstvinstaller.co.za/wp-content/uploads/2018/02/no-300x141.pngLocalDSTV2019-05-29 10:45:582019-11-21 10:39:13Netflix How To | How Do I Change My Netflix Plan?
Are you a big Netflix fan, but the South African content options frustrate you? By using a VPN you can unlock Netflix America in South Africa. You need to work around the geo-block on the website. But to access Netflix America, you still need to activate an account on the site.
We’ve gathered the best VPN’s to watch Netflix America in South Africa, so that you can use the Virtual Private Network (VPN) to expand your Netflix experience.
What is a VPN
A VPN changes your device’s IP address to not be linked to your location. It serves as an encrypted middleman between your device and the internet. All the information exchanged between your device and the internet, becomes encoded in the VPN’s encrypted tunnel.
Although this encryption process can interfere with the browsing speed, you gain cyber safety. Your online privacy is bulletproof when you use a VPN, because your IP address becomes anonymous. This means that an outside source can’t access your location or track your online searches.
image by avg_com
Choosing Between a Smart DNS and a VPN
The alternative option to watch Netflix America in South Africa, is to use a Smart DNS service. Both options will hide your device’s location to unlock geo-restricted content. But only the VPN will completely change your IP address.
The Smart DNS service can offer you quicker browsing/streaming speeds. But it can’t offer you the level of cyber safety that a VPN can give you. Because the VPN encrypts information, it affects the browsing/streaming speed. A Smart DNS service only reroutes/redirects a portion of your web traffic.
The biggest risk of a using a VPN provider, is when you choose to use a free VPN. You are allowing a third-party to stand between your device and your online browsing. It’s crucial to know exactly who you are dealing with. By carefully reading a company’s privacy policy, you can make sure that your cyber safety is in good hands.
A VPN provider must clearly state that they do not do any IP logging, or at least as little as possible. The VPN provider needs to adhere to their country’s privacy laws. And some governments require by law a certain amount of user information storage. So make sure you know where the VPN servers are located.
A free VPN service provider can also expose you to a man-in-the-middle-attack. You might think you are connecting directly with a specific website, but before your personal information reaches it, a third party first has access to it. Another issues can be traffic restrictions which will affect your browsing experience.
How to Use a VPN Safely
Rather use a paid VPN service provider. Make sure it has a strong encryption protocol as well as good privacy policies. You can also consider reading reviews from other users, to get a better idea of what the VPN provider will be offering you.
To create a special new IP address for your device, the VPN’s server has to be located in a specific country. Read up about the country’s privacy and cybersecurity laws before committing to using its services. The encryption process is notorious for slowing down the browsing speed. A reputable VPN service provider compensates for this by using top speed servers. Also, make sure that your VPN service provider stipulates a strict zero-logging policy.
The Best VPN’s To Watch Netflix America in South Africa
To directly compare the best VPN’s to Watch Netflix America in South Africa, a few factors are used:
Reliable service and fast speed
Zero logs and strong security
Easy unblocking of geo-restricted content
Location: 148 locations in 94 countries
America, Europe, Asia Pacific, Middle East and Africa
Pros:
Fast streaming speeds
Excellent class security and built-in privacy features
Can unlock a wide range of geo-locked sites
User-friendly apps for various device platforms
24/7 support with live chat to well-trained staff
Cons:
Pricey when compared to other VPN suppliers for South Africa
Supportedplatforms: Windows, Linux MacOS, Android and iOS
Rating:
9.8
Cost: $12.95 per month$99.95 for 15 months
Location:
America, Canada, Brazil, United Kingdom, France, Spain, Italy, Netherlands,
Austria, Poland, Switzerland, Germany, Sweden, Romania, Russia, Lithuania, Singapore, Hong Kong, Australia, and South Africa
Pros:
Good budget option for streaming and downloading
Can unlock a wide range of geo-locked sites
Excellent privacy and security protection
Zero-logging
Cons:
Desktop app can be tricky to use
Supportedplatforms: Android, Windows, iOS and MacOS
Rating:
9.4
Cost:
$11.95 per month
$69 per year
Location:
Canada, Mexico, North America, Austria, Belgium, Bulgaria, Czech Republic, Denmark, Asia India, Indonesia, Japan
Pros:
Usually good and stable streaming speeds
Does not keep any identifying logs
Speeds are mainly fast and stable
Unblock Amazon Prime Video, Hulu, Netflix, and BBC iPlayer
Cons:
Limited options for advanced configuration
Pricey for the product value received
Does not support cryptocurrency payment method.
Supportedplatforms:
Windows, Android, MacOS, and iOS
Rating:
7.6
Cost:
$9.95 per month
$60.00 per year
Location:
North America (57), South America (13), Europe (20), Asia (17), Oceania (7), Africa (9)
Pros
Almost no effect on connection speed
Good connection stability
Money-back Guarantee
Free version also available
Cons
No extensive database for problem-solving
Limited number of available servers
Supportedplatforms:
Windows, Android, MacOS, and iOS
Rating:
9.2
Cost:
$6.99 per month
$35.88 per year
Location:
United States, Canada, Mexico, Brazil, China, Hong Kong, Japan, India, United Kingdom, France, Germany, Netherland, Denmark, Ireland, Sweden, Spain, Switzerland, Russia, Czech Republic, Ukraine, Turkey, UAE, Iran, New Zealand, Australia
Pros
Fast streaming
User-friendly interface
Cons
Browsing activity is logged, but not linked to you personally
No advanced customization options
Supportedplatforms:
Windows, Android, MacOS, and iOS
Rating:
9.6
Cost:
$12.99 per month
$71.88 per month
https://localdstvinstaller.co.za/wp-content/uploads/2019/05/netflix-how-to.png600600LocalDSTVhttps://localdstvinstaller.co.za/wp-content/uploads/2018/02/no-300x141.pngLocalDSTV2019-05-07 16:12:592019-11-21 10:39:20Netflix How To | The Best VPN’s To Watch Netflix America in South Africa
If you are a big Netflix fan, but you are frustrated by the limited content on the South African site, you can watch Netflix America in South Africa by using a Smart DNS proxy. It’s a fast and easy way to unblock geo-restricted content.
What is a Smart DNS Proxy
A DNS (Domain Name System) is the system that turns a domain name into IP (Internet Protocol) address. For example, google.com becomes 8.8.8.8. Usually the DNS is located close to your computer’s IP address. And an IP address is assigned according to your location.
By using a Smart DNS, you can transfer your IP address location to another country. Unlike using a VPN, it does not permanently change your IP address, it simply relocates it. If you want to access Netflix America in South Africa, and not compromise your online streaming speed, it is recommended to use a Smart DNS Proxy. To access Netflix America you still need to pay for the content, but you must first hide your real location.
The Risks of Using a Free Smart DNS Service
Opting to use a free Smart DNS service can be tempting, but it is not advisable. Once you activate a DNS it acts as a proxy between your device and online browsing. Oftentimes free DNS proxies are used to mine data. The usage can range from innocent marketing purposes, to criminal intent to steal your personal information. It’s best to choose a reputable Smart DNS service.
Another problem with free Smart DNS services, is that they often don’t allow you to use https:// sites. The s in the http stands for secure. Without this, you are exposed online, without any guarantees of browsing safely. It is another way of compromising your cyber security and potentially exposing your personal information to cyber criminals.
Rather choose to use a paid Smart DNS service. You can investigate the company to know exactly who you are dealing with. The most important aspect of choosing a Smart DNS service provider, is to make sure you know where the proxy is located. Every country has different privacy and cybersecurity laws. In some countries it’s legal to sell your online browsing data. Plus, other countries are forced by their governments to store certain personal data of clients.
Carefully read through the company’s privacy policy. If you feel uncomfortable with certain stipulations, rather choose a different provider. Also, make sure that the DNS service has good security protocols. If it forbids the usage of https:// — do not choose it.
Supported Devices
PC, Mac Devices (Mac, iPad, iPod, iPhone, Apple TV), Android Tablet and Phone, Windows Phone, Amazon Fire TV, Kindle Fire, Google TV, Now TV Box,
Chromecast, Boxee,
Roku, Xbox One and 360, Xbox, Wii and Wii U, PlayStation 3/4, WDTV,
Smart TV’s: Samsung,
PC, Mac Devices (Mac, iPad, iPod, iPhone, Apple TV), Android Tablet and Phone, Windows Phone, Amazon Fire TV, Kindle Fire, Google TV, Now TV Box,
Chromecast, Boxee,
Roku, Xbox One and 360, Xbox Wii and Wii U, PlayStation 3/4, WDTV,
Smart TV’s: Samsung,
Netflix America only allows access to paid subscribers. All free trials must be upgraded.
Supported Devices
PC, Mac Devices (Mac, iPad, iPod, iPhone, Apple TV), Android Tablet and Phone, Windows Phone, Amazon Fire TV, Kindle Fire,
Boxee,
Roku, Xbox One and 360, Xbox, Wii and Wii U, PlayStation 3/4, WDTV,
Smart TV’s: Samsung,
LG, Philips, Sony
Services/channels:
255
Pros
Netflix America supported on every device on the Smart DNS network (after paid upgrade)
Add-on of VPN and Smart VPN
More than 200 Global VPN Nodes
Offers a fast DNS Response in South Africa, Australia, Asia, Europe, and America
Can support multiple devices
User-friendly web interface for changing Smart DNS regions.
Good discounted rates for longer subscriptions (year or more)
Netflix America only allows access to paid subscribers. All free trials must be upgraded.
Supported Devices
PC, Mac Devices (Mac, iPad, iPod, iPhone, Apple TV), Android Tablet and Phone, Windows Phone, Now TV Box, Sky HD Box, Boxee,
Roku, Smart TV’s: Samsung, LG, Philips, Panasonic, Sharp Smart, Sony, Toshiba
PC, Mac Devices (Mac, iPad, iPod, iPhone, Apple TV), Android Tablet and Phone, Amazon Fire TV, Kindle Fire, Google TV, Now TV Box,
Chromecast, Boxee,
Roku, Xbox, Xbox PlayStation 3/4, most of the Smart TV Models.
Netflix America not properly supported on the Smart DNS network.
Does not provide global DNS network
Channels supported could be broader
BBC does not work properly at all times
https://localdstvinstaller.co.za/wp-content/uploads/2019/05/netflix-how-to.png600600LocalDSTVhttps://localdstvinstaller.co.za/wp-content/uploads/2018/02/no-300x141.pngLocalDSTV2019-05-06 14:55:272019-11-21 10:39:27Netflix How To | The Best Smart DNS Proxy to Watch Netflix America in South Africa
Are you wondering when your next DStv payment due date is? It is quite easy to see on DStv’s new self service dashboard.
Follow these steps.
Log into DStv self service at https://www.dstv.co.za/self-service – if you are logged in it will automatically take you to your dashboard.
If your are not logged in – then log in using your username and password:
Click on “dashboard”
Here you should be able to see your DStv payment due date underneath the balance amount that you owe. See image for details.
We hope you found this useful. Please leave any comments in the section below.
https://localdstvinstaller.co.za/wp-content/uploads/2018/02/no-300x141.png00LocalDSTVhttps://localdstvinstaller.co.za/wp-content/uploads/2018/02/no-300x141.pngLocalDSTV2019-05-06 12:41:062019-11-21 10:40:05How to Find Out Your DStv Payment Due Date and Amount
If you want to watch Netflix America in South Africa, you can do so with a Smart DNS proxy or VPN (Virtual Private Network) Read our post how to watch American Netflix in South Africa to learn more about the different options available to access the Netflix America suite of programs in South Africa.
Smart DNS Proxy vs VPN
Before we look at the best option for you to choose, first a basic explanation of the difference between the two technologies.
A Smart DNS is used to access geo-restricted content. A DNS (Domain Name System) is the system that translates internet domain names into IP (Internet Protocol) addresses. For instance, google.com becomes 8.8.8.8.The DNS is usually located close to your computer’s IP address. If you use a Smart DNS provider, information will be redirected through a proxy server, which is not restricted by your current location.
Alternatively you can use a VPN which is used to add privacy and security to all your online activity. Setting up a VPN tunnel, your identity and online activity will be encrypted, meaning that outside sources can’t access your location or track your searches.
The biggest difference between a Smart DNS and a VPN is the privacy. A Smart DNS does not use encrypted connections. It also doesn’t change your device’s IP address. The DNS server location is used to gain access to blocked content.
Your connection to the internet will be faster with a Smart DNS because there is no delay to encrypt data, as with a VPN tunnel. If you are interested in cyber security, you will need to choose a VPN.
Smart DNS Explained
To access Netflix America in South Africa, you need to trick the service into thinking that you are in America. You will still need to pay for the content, creating a separate account for the American Netflix site.
If you are only concerned with streaming speed, you can use the Smart DNS technology to do this. By using a remote DNS server, you will be able to mask your location, but your private information will not be encrypted and your IP address not hidden.
VPN Explained
The VPN technology is a great way to protect your online privacy. Although using a VPN’s encrypted tunnel can slow down your browsing speed, it is a small price to pay to remain protected online.
A VPN service will create a new IP address for your device, which is not linked to your location, offering you access to Netflix America in South Africa. The Virtual Private Network (VPN) creates an encrypted middleman point between your device and the internet, where your IP address is changed and it becomes anonymous.
Choosing Between a Smart DNS and a VPN
Both these options will change or hide your device’s location to unlock geo-restricted content, so you can use either to watch Netflix America in South Africa. Your choice will depend on whether you are interested in online streaming speed or data security.
The Smart DNS will only reroute/redirection a portion of your web traffic, compared to a VPN which encrypts all of your online activity through the encryption tunnel. This function of the VPN will have an effect on the online streaming speed. If you are not concerned about online browsing anonymity, you can use a Smart DNS to access Netflix America in South Africa.
Risks of Using a Smart DNS Service
image by avg_com
You might be tempted to opt to use a free Smart DNS service provider. The DNS becomes the proxy between your device and the internet. This means that the proxy has access to your online activity. Many free proxies are used to mine data. It could be as innocent as gathering browsing information for marketing purposes, but some free Smart DNS proxies also use their service to steal your personal information. Rather use a reputable Smart DNS service provider.
With a free Smart DNS service you also don’t know who is providing you with the IP address codes. It could be generated by a cybercriminal organization or maybe a government surveillance program. While you are using the free Smart DNS service, you are giving up your personal information such as usernames and passwords, as well as bank account numbers.
Some Smart DNS services don’t allow you to use https:// sites. This is a safety feature of browsers, to give you cyber safety. The http:// sites expose your online activity, offering up your personal information to anyone that has access to the proxy. An unsecure Smart DNS service can also manipulate the website you visit, stealing cooking or injecting advertising. Oftentimes these ads can carry malware.
How to Use a Smart DNS Proxy Safely
It’s best to rather use a paid Smart DNS service. This way you know exactly who you are dealing with. A legitimate provider will offer you information about their whereabouts and openly offer you their operating procedures.
You can also do more research about the company through a thorough online search. If there are any security risks, you will be warned by other users that have used their services. It’s important to check in which country the Smart DNS provider is located. Each country has its own set of cybersecurity and privacy laws. In some countries it is legal to sell your browsing data.
Make sure you carefully read the company’s privacy policy. Even if it is a legitimate provider, you may be offering up certain privacy rights, affecting how the proxy provider will be dealing with your personal information. If at any time you feel uncertain of the company’s operating procedures, rather choose another one. Lastly, make sure that the DNS provider has good security protocols in place. If it forbids the use of https:// — do not use it. Some companies will even offer extra encryption protocols for better online security and secure connections.
Risks of Using a VPN
image by avg_com
Same as with Smart DNS proxies, if you choose to use a free VPN, you are at risk of your online security being compromised. It is crucial to read the company’s privacy policy, because you are allowing a third party to handle your online data.
The VPN offers you online privacy by agreeing to not do any IP logging, or at least as little as possible. If you choose to use a disreputable VPN service, you can’t tell what they are doing with the logs they might be keeping. A VPN provider must also adhere to the country’s privacy laws. Some governments require by law that some user information is stored. So make sure you know from which country your VPN service provider operates.
If you decide to use a free VPN service provider or one with a dubious privacy policy, you can be exposed to a man-in-the-middle-attack. This means you think you are connecting directly with a website. But a third party first has access to your personal information. Some VPN’s also have a lot of traffic restrictions, which can affect your browsing experience.
How to Use a VPN Safely
It is best to use a paid VPN service provider. You can research the company properly to make sure that you agree with all their privacy policies. Also read other people’s opinions of the company. A strong encryption protocol and good privacy policies will ensure a safe online experience.
Check up on your VPN service provider’s server network. To create a specific IP address, the VPN has to have servers located in that country. Once you know the country, you can read up about its cybersecurity and privacy laws. The servers also need to compensate for the encryption slowing down your internet connection. A reputable VPN service provider will have top speed servers. Lastly, make sure that the VPN service provider clearly states that it offers a strict zero-logging policy.
https://localdstvinstaller.co.za/wp-content/uploads/2019/05/photo-by-techtuts.co-How-to-Choose-Between-a-Smart-DNS-and-VPN.jpg600600LocalDSTVhttps://localdstvinstaller.co.za/wp-content/uploads/2018/02/no-300x141.pngLocalDSTV2019-05-03 13:13:352019-11-21 10:40:05How to Choose Between a Smart DNS and VPN?
https://localdstvinstaller.co.za/wp-content/uploads/2019/03/How-To-Pay-Your-DStv-Account-With-Your-Capitec-App-On-Your-Mobile-Phone.jpg7201280LocalDSTVhttps://localdstvinstaller.co.za/wp-content/uploads/2018/02/no-300x141.pngLocalDSTV2019-03-31 01:23:422019-03-31 02:03:57How to Pay Your DStv Account With Your Capitec App On Your Mobile Phone
It is quick and easy to check your DStv account balance on your mobile phone.
dial *120*68584#
Select option 1
Your DStv account balance will appear on the screen.
This method use USSD technology.
https://localdstvinstaller.co.za/wp-content/uploads/2019/03/How-To-Check-Your-DStv-Account-Balance-On-Your-Mobile-Phone.jpg7201280LocalDSTVhttps://localdstvinstaller.co.za/wp-content/uploads/2018/02/no-300x141.pngLocalDSTV2019-03-31 00:26:142020-04-18 18:07:41How To Check Your DStv Account Balance On Your Mobile Phone
https://localdstvinstaller.co.za/wp-content/uploads/2018/02/no-300x141.png00LocalDSTVhttps://localdstvinstaller.co.za/wp-content/uploads/2018/02/no-300x141.pngLocalDSTV2019-03-29 09:21:142019-11-21 10:40:06How to pay your DStv Subscription Online
The DStv Explora has made finding what you’re in the mood for even simpler.
So you can find your perfect entertainment match quick and easy just by a click of a button.
The first option, is to press the “i” on your remote to see the title of what you’re watching. Scroll down to see the DStv schedule for the next 24 hours.
Want a bird’s eye view of all your available channels? Press the right arrow (marked grid) to call up the channel list.
More Options To Guide Your Viewing
Use the TV Guide
Use the TV Guide to check what’s coming up in the next 8 days.
Features
Hit Search to find the show you’re looking for.
You can be as general or specific as you like.
You can do searches based on PG Rating, or on Themes like drama or comedy.
You can search for things like movies starting in the next few minutes. Or all live sports events coming up in the next 24 hours.
You can even search for documentaries or magazine shows that feature your favourite sports team.
Set a reminder on your favourite shows
Here’s another awesome Explora function. If you find something that you really want to watch but it’s already started, you don’t have to panic. You can check when it’s showing by :
Step 1- pressing OK on the program and selecting Other Airings.
Step 2- From here you can set a reminder or a recording and make sure you catch it next time it is on.
Step 3- Press the blue DStv button on your remote to get to DStv Central for a quick look at the latest Box Office and Catch Up shows.
Step 4- Or if you want to go straight to Box Office, just press the green button to go directly to the Box Office menu to rent a movie of your choice. Or press the Catch Up button, to catch up on any series, movies, sports, and more that you might have missed. Easy to find thanks to the categories and program picture displays.
And that’s it! All in the palm of your hand. Check out what’s new, see what’s coming up, or search for something specific. Rent a new release blockbuster, or catch up on the hottest shows. With the Explora finding something to watch is easy. It’s just a matter of deciding what to watch first!
For more interesting tips and short-cuts, visit www.dstv.com/explora.
DStv Explora – the best just got better.
https://localdstvinstaller.co.za/wp-content/uploads/2018/10/DSTV-Self-Service-How-to-find-what-to-watch.jpg460786LocalDSTVhttps://localdstvinstaller.co.za/wp-content/uploads/2018/02/no-300x141.pngLocalDSTV2018-10-08 16:22:132019-04-08 09:50:17DStv Explora Info: How To Find What You Want To Watch
Do you sometimes feel like you’re not getting the full picture from your tv? Or that your soccer ball is looking more like a rugby ball?
Depending on the DStv channel or program that you are watching, you may want to change the aspect ratio setting on your decoder, so that you are getting the best display possible. It’s really easy to do.
If you have a newer decoder
Step 1- Press the shift and TV Guide buttons on your remote to access the ARC or Aspect Ratio Settings.
Setp 2- Then select the one that works best for you.
If you have an older decoder
Step1- Press the Menu button,
Step 2- Select Advanced Options, followed by TV Installations.
Step 3- Select TV Installations for TV 1
Step 4- Select the Aspect Ratio and mode viewing setting of your choice.
If you have a wide screen television just make sure that it is not set to automatically adjust the picture as this will clash with your decoder settings.
Enjoy your viewing. DStv – so much more for you.
https://localdstvinstaller.co.za/wp-content/uploads/2018/10/DSTV-Self-Service-Get-the-best-picture-from-your-tv.jpg455795LocalDSTVhttps://localdstvinstaller.co.za/wp-content/uploads/2018/02/no-300x141.pngLocalDSTV2018-10-08 15:30:462019-04-08 09:59:47Get the best picture from your TV
Try the following as a possible first step to fixing the issue:
1.Switch the DSTV decoder off at the plug, wait a few seconds, then switch it on again. And your decoder will do the rest.
2. If you have an HD PVR decoder, press the reset button on the front of the decoder.
3. If you have DStv Explora, press and hold the standby button on your remote.
Remember to keep your Smartcard inserted throughout the reboot process, or the decoder will be unable to reboot properly.
https://localdstvinstaller.co.za/wp-content/uploads/2017/10/DSTV-HD-installations-1.jpg401600LocalDSTVhttps://localdstvinstaller.co.za/wp-content/uploads/2018/02/no-300x141.pngLocalDSTV2018-10-08 14:57:252019-07-05 15:51:10How to reboot your DSTV Decoder
Did you know that DStv Premium subscribers can watch the world’s hottest live sport online at Supersport.com or via the Supersport apps? (iTunes | GooglePlay)
Step 4- Link your DStv account and get connected today!
DStv – Live is better with digital.
https://localdstvinstaller.co.za/wp-content/uploads/2018/10/DSTV-Self-Service-Connect-ID-–-Stream-live-sport_.jpg449792LocalDSTVhttps://localdstvinstaller.co.za/wp-content/uploads/2018/02/no-300x141.pngLocalDSTV2018-10-08 14:34:232019-04-08 10:06:24Connect ID – Stream live sport
Step 3- Choose the program you want to record and select record. You will receive a confirmation message to confirm the recording.
If there’s already a recording in progress at the same time, the remote recording will take priority.
The Explora will automatically delete any conflicting recordings and try to reschedule whenever possible.
For more information visit dstv.com/GetConnected or for step-by-step videos, go to DStv Catch Up on your DStv Explora
https://localdstvinstaller.co.za/wp-content/uploads/2018/10/Find-out-more-about-how-Remote-Recordings-work_.jpg439780LocalDSTVhttps://localdstvinstaller.co.za/wp-content/uploads/2018/02/no-300x141.pngLocalDSTV2018-10-05 17:58:422019-04-08 10:31:12Find out more about how Remote Recordings work
Looking for a quick and easy way to find out where to pay your DStv subscription?
Option1- Dial *120*68584# and select option 2 (where can I pay) Option2- Or pay online by visiting dstv.com and click on My DStv, select Pay Now.
Please keep your DStv decoder switched on with the Smartcard inserted to receive the reset command after payment has been made.
Quick and easy self-service with DStv!
https://localdstvinstaller.co.za/wp-content/uploads/2018/10/My-DStv-–-Where-and-How-to-Pay_.jpg390900LocalDSTVhttps://localdstvinstaller.co.za/wp-content/uploads/2018/02/no-300x141.pngLocalDSTV2018-10-05 17:38:402019-04-08 10:53:43My DStv – Where and How to Pay
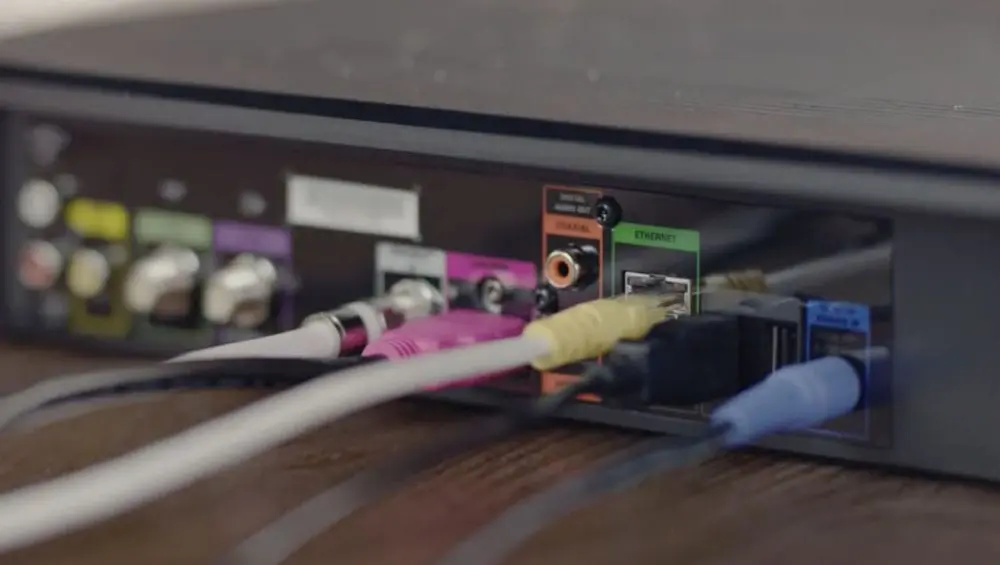
If your decoder is in the same room as your router, the easiest way to connect it, is to use an ethernet cable. Follow the easy steps below and get connected to the internet.
Step 1- Plug the ethernet cable into the green ethernet port on the back of your decoder.
Step 2- Plug the other side of the ethernet cable into an ethernet port on your router.
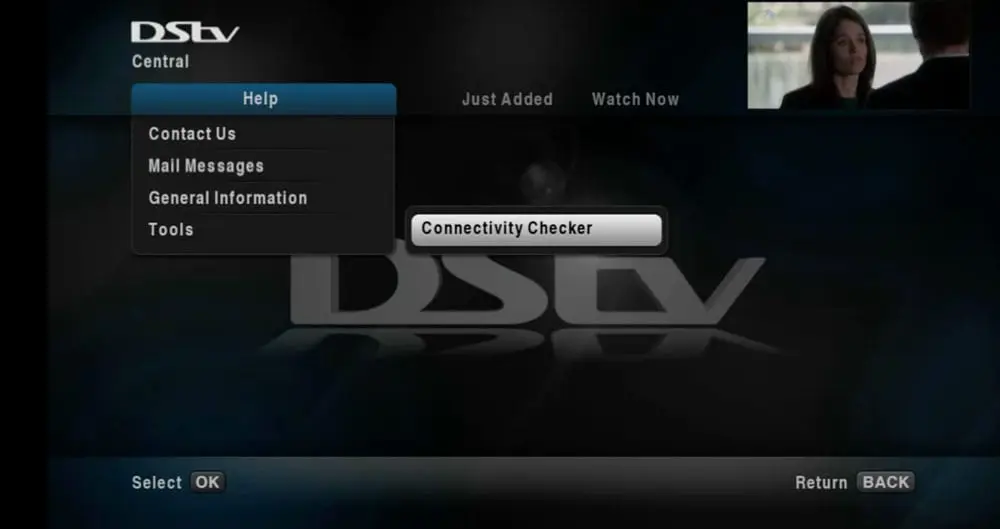
Step 3- Use the connectivity checker to make sure that you a connection has been established with the internet.
Step 4- Press Help, select Tools, select Connectivity Checker and press OK.
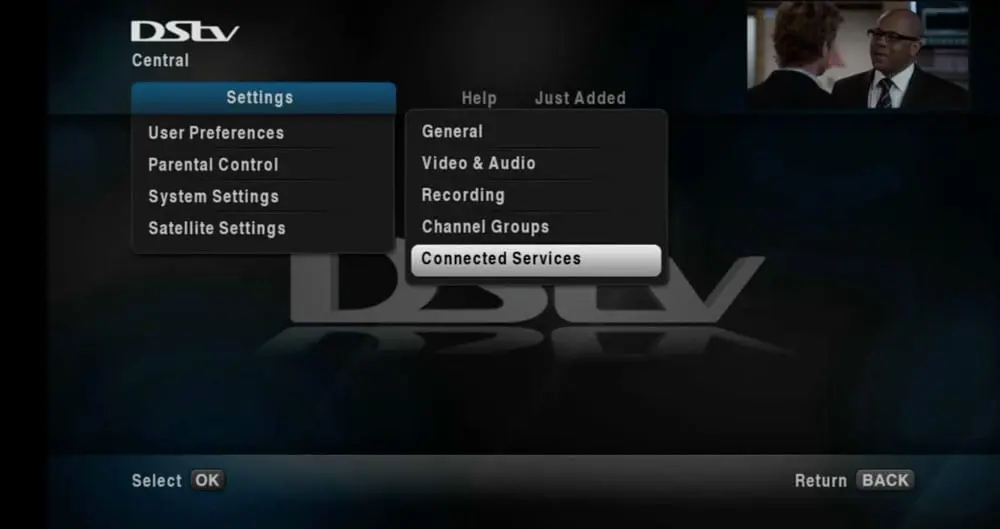
Step 5- You will need to switch on your connected services. The default setting for all connected services is off. You will need to manually select which of the services you want enabled.
To do this, simply press the blue DStv button on your remote. Select settings, select User Preferences, select Connected Services. And then choose which services you want on, and which you want off.
That’s it, you’re connected and rearing to go! Visit dstv.com/GetConnected for more information.
https://localdstvinstaller.co.za/wp-content/uploads/2018/10/how-to-connect-your-dstv-explora-to-the-internet-using-an-ethernet-cable.jpg445816LocalDSTVhttps://localdstvinstaller.co.za/wp-content/uploads/2018/02/no-300x141.pngLocalDSTV2018-10-05 17:33:072019-03-29 08:47:40HOW TO connect your DStv Explora to the internet using an Ethernet cable
https://localdstvinstaller.co.za/wp-content/uploads/2018/10/DStv-Wifi-Connector-How-to-connect-to-Explora-New.jpg600727LocalDSTVhttps://localdstvinstaller.co.za/wp-content/uploads/2018/02/no-300x141.pngLocalDSTV2018-10-05 17:14:422019-10-16 11:45:31How to connect your DStv Explora to the internet using the DStv WiFi Connector (Manual)
You now have online access to hundreds of extra titles on Catch Up plus. You can also set recordings on your Explora remotely.
How To Connect Your DStv Explora to the Internet
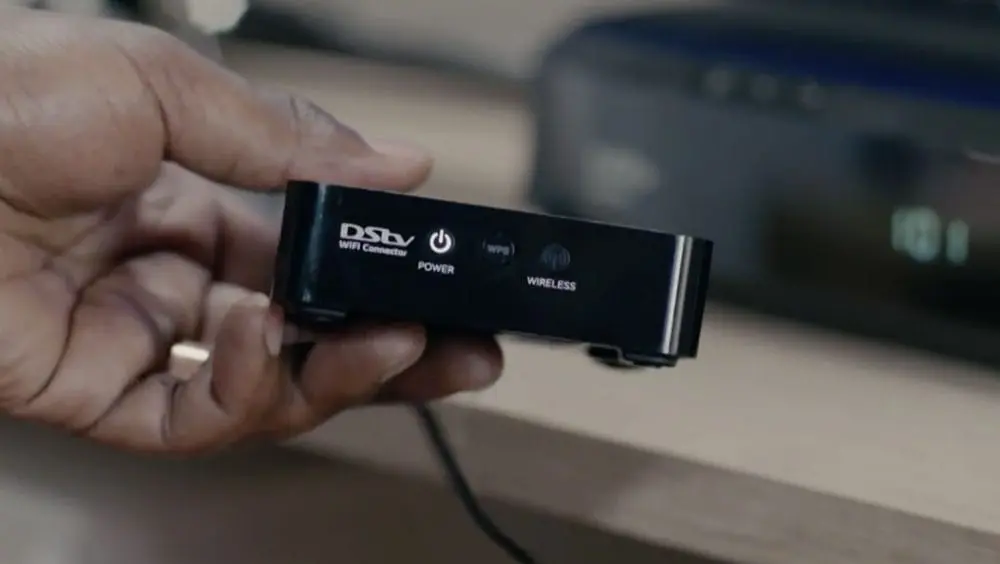
Print the check list off the DStv website for a step by step guide. If your decoder and router are too far apart to run a cable between them, you need a DStv Wifi Connector. If your decoder does not have a WPS button, click to this tutorial. Otherwise, follow the steps here.
2. Connect the decoder and DStv Wifi Connector with the USB cable. The power LED on the front of the DStv Wifi Connector will change to white. Do not put the DStv Wifi Connector on top of the decoder, place it next to it.
3. First press the WPS button on the router, and next press the WPS button on the DStv Wifi Connector. Wait for 2 minutes. If you cannot get the DStv Explora to connect using the WPS button, use the steps where there is no WPS button on your router (manual setup)
The LED on the front of the DStv Wifi Connector will flash and then change to solid white once an internet connection is established.
4. Next take the ethernet cable, insert the one side into the green ethernet connector on the decoder, and the other side into the DStv Wifi Connector. Now use the Connectivity Checker on your Explora to confirm that you are connected to the internet. Press Help, select Tools, select Connectivity Checker, and press OK.
Next you will need to switch on the Connected Services. The default setting for all connected services is off. You will need to manually select the services that you want enabled. Press the blue DStv button on your remote. Select Settings, select User Preferences, select Connected Services. And then choose which services you want on and which you want off.
That’s it! You’re connected, and rearing to go. Visit dstv.com/GetConnected for more information.
https://localdstvinstaller.co.za/wp-content/uploads/2018/10/DStv-Wifi-Connector-How-to-connect-to-Explora-Old-1.jpg600727LocalDSTVhttps://localdstvinstaller.co.za/wp-content/uploads/2018/02/no-300x141.pngLocalDSTV2018-10-05 17:12:272019-03-25 14:40:53HOW to connect your DStv Explora to the internet using the DStv WiFi Connector (Automatic)
Change the way you watch television with DStv Explora!
Your shows are ready when you are. Access DStv Catch Up with more than 200 hours of content. Use the Series Stacking setting to watch multiple episodes of your favourite show. DStv Catch Up Plus has hundreds of extra titles available for download. Look out for the series box sets to download.
Rent the latest blockbusters with Box Office from the comfort of your couch.
Up to 20 titles added each day. Your first rental is for free.
Never miss a moment. Watch one channel while recording another.You can record up to 220 hours of programming. Record your favourite series automatically and find out when it’s on again.
Your entertainment sorted with easy-to-use menus and categorised playlists.
Make it your own with personalised features – your favourite channels grouped for your convenience.
Less surfing, more exploring! Use the advanced search function to find your favourite series. Type in a search word or part of the word for matching shows to pop up. Specify where and when you want to watch it. Or select the theme and PG rating.
The home of all things DStv. Use DStv Central to easily browse through content. Access sports updates, news, plus local and international weather. And use the dedicated search button to easily access content.
All the power in the palm of your hands!
You can pause live TV for up to 2 hours, and use instant replay or slow motion.
You can watch 2 different channels on separate televisions with XtraView. The Explora offers high definition (HD) viewing with up to 5 times more picture detail and brilliant colour quality. It also supports Dolby Digital sound.
Want to connect to your DStv Explora to your home internet? Is your decoder in a different room to your router and too far to run an ethernet cable between the two? Then you will need a DStv WiFi connector to connect your Explora and router wirelessly.
Firstly you need to check whether your router has a WPS button. If it has then you need to watch the tutorial showing you what to do if your router has a WPS button. If not, keep watching this tutorial.
If your router does not have a WPS button
Step 1- Set up your laptop close to your router
Step 2- Make sure your laptop is connected to the internet
Step 3- Place your DStv WiFi connector next to the DStv Explora and not on top of it
Step 4- Take the power cable supply and connect the USB input into your laptop
Step 5- Plug the other side into the power input of the WiFi connector
Step 6- Plug your ethernet cable into the ethernet port on the back of your laptop
Step 7- Plug the other side into the DStv WiFi Connector
Step 8- Open a web browser on your laptop and type http://dstvwifi.local/ in the address bar
Step 9- Select your specific router from the list
Step 10- Enter your wireless password
Step 11- Press connect
Step 12– Disconnect the DStv WiFi Connector from your laptop
Connecting Your DStv WiFi Connector with Your Explora
Step 13- Plug your ethernet cable into the green ethernet port on the back of your Explora.
Step 14- Plug the other side into the DStv WiFi Connector.
Step 15- Plug the USB cable into the Explora.
Step 16- Plug the other side into the power input of the WiFi connector.
Step 17- Wait for the power LED on the front of the DStv WiFi connector to change to white. Wait for 2 minutes.
The WiFi LED on the front of the DStv WiFi connector will flash and then change to solid white once an internet connection has been established.
Step 18- Now use the Connectivity Checker on your Explora to confirm that you are connected to the internet.
Step 19- Press Help, select Tools, select Connectivity Checker, and press OK.
Next you will need to switch on the Connected Services.
The default setting for all connected services is off. You will need to manually select the services that you want enabled.
Step 1- Press the blue DStv button on your remote.
Step 2- Select Settings
Step 3- Select User Preferences
Step 4- Select Connected Services. And then choose which services you want on and which you want off.
That’s it! You’re connected, and rearing to go. Visit dstv.com/GetConnected for more information.
Want to connect your DStv Explora to your home internet? Is your Explora in the same room as your router? Then the easiest way to do this, is by using an ethernet cable.
Connect your DStv Explora to your home internet
Step 1- Plug an ethernet cable into the green ethernet port on the back of your decoder.
Step 2- Plug the other side of the cable into any ethernet port on your router.
Step 3- Now use the connectivity checker to make sure that you are connected to the internet. Step 4- Press Help, select Tools, select Connectivity Checker and press OK. Step 5- Next you will need to switch on your connected services. The default setting for all connected services is off. You will need to manually select which of the services you want enabled.
Step 6– To do this, press the blue DStv button on your remote. Select settings, select User Preferences, select Connected Services. And then choose which services you want on, and which you want off.
That’s it, you’re connected and rearing to go! Visit dstv.com/GetConnected for more information.
https://localdstvinstaller.co.za/wp-content/uploads/2018/10/How-to-connect-your-Explora-to-the-internet-using-the-ethernet-cable_.jpg437803LocalDSTVhttps://localdstvinstaller.co.za/wp-content/uploads/2018/02/no-300x141.pngLocalDSTV2018-10-05 13:29:142019-04-09 08:39:08How to connect your Explora to the internet using the ethernet cable
Do you have your favourite show you don’t want to miss and forgot to set the recording before leaving the house?
No worries! If you’ve connected your DStv Explora to the internet, you can use your mobile phone, tablet, or laptop to set your recording while you’re out and about.
How to do that?
Step 1- Log on to the Tv Guide using the DStv Now app.
Step 2- Type in your connect ID and choose the show you want to record. Recordings can be set up to 8 days in advance.
Step 3- Click to record and that’s it. You will receive a confirmation of your remote recording within a few seconds.
Please remember that remote recordings are given the highest priority on your Explora.
So any conflicting scheduled recordings will be cancelled. The good news is that your Explora will try to reschedule these cancelled recordings wherever possible. There’s no limit to the number of recordings you can schedule. As long as you have enough recording space available. So keep an eye on how much available space you have left.
It’s a good idea to keep the Auto Delete feature switched on, as this automatically delete older unlocked recordings from your playlist, to make space for new recordings.
The DStv Explora – putting total viewing recording control in your hands!
With the new and upgraded DStv Catch Up there are now even more reasons to spoil yourself with an Explora. Find your favourite shows, discover new ones with the new search feature.
It is now easier than ever to find your favourite shows and discover new ones with the new Instant Search feature. Hit the search button, enter the first few letters of the show you’re looking for, and voila, instant matching search results. Your DSTv experienced is now better than ever.
DStv Catch Up and DStv Catch Up Plus has been merged. If your DStv Explora is connected to the internet, you will find the full selection of Catch Ups available, all in the same place. The little download icon lets you know which shows are available for download. And the great news is, that you can now watch your shows while they download. No more waiting!
More reasons to now upgrade to the Explora and the DStv Premium today.
For more info, visit dstv.com/GetConnected
https://localdstvinstaller.co.za/wp-content/uploads/2018/10/New-and-improved-DSTv-Catchup.jpg452807LocalDSTVhttps://localdstvinstaller.co.za/wp-content/uploads/2018/02/no-300x141.pngLocalDSTV2018-10-05 11:53:322019-03-29 08:53:50Explora – New and Improved DStv Catch Up
Want all the perks of PVR viewing but don’t have DStv Premium?
No problem because you can pause, rewind, fast forward and record your favourites, no matter which DStv package you subscribe to.
All you need is a PVR or DStv Explora, pay our monthly access fee and there you have it. Total viewing control in the palm of your hand.
The DStv Explora – effortless entertainment.
https://localdstvinstaller.co.za/wp-content/uploads/2018/10/DStv-Explora-Tips-Explora-for-All.jpg443792LocalDSTVhttps://localdstvinstaller.co.za/wp-content/uploads/2018/02/no-300x141.pngLocalDSTV2018-10-04 17:56:002019-04-08 15:10:09DStv Explora Tips – Explora for All



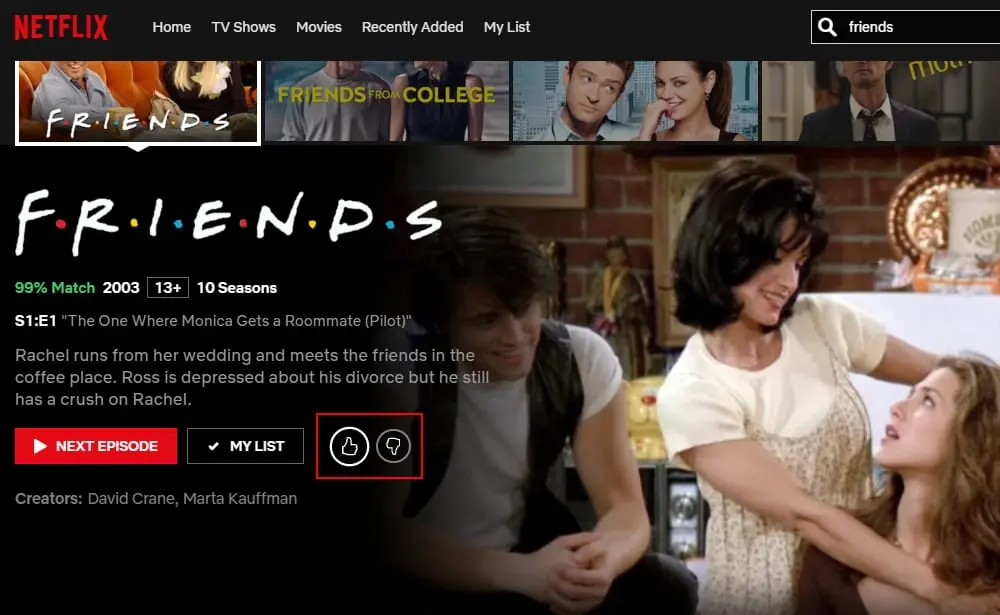








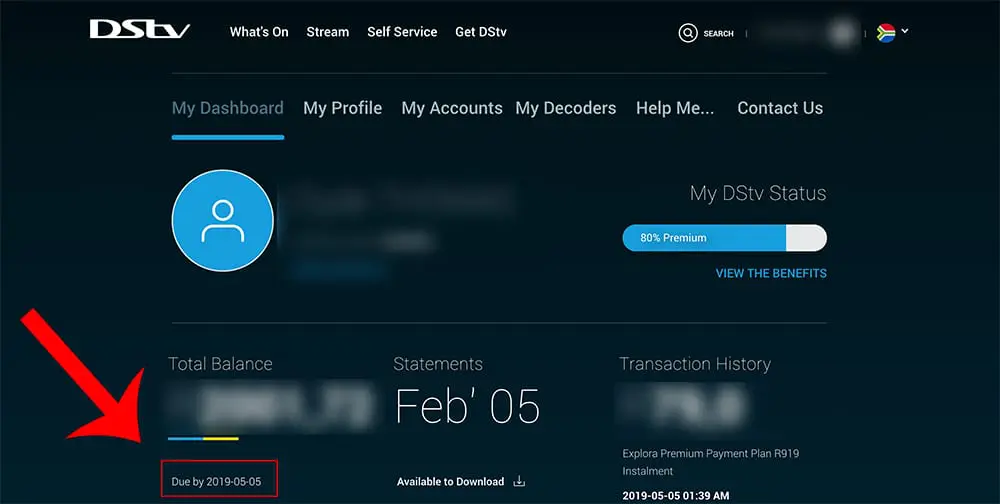
 photo by techtuts.co





 Print the check list off the DStv website for a step by step guide. If your decoder and router are too far apart to run a cable between them, you need a DStv Wifi Connector. If your decoder does not have a WPS button,